The first version of Marcia Alpaca is from 2016, and I designed it for DMC. It's an almost furious yellow, with a super-colorful aguayo and tassels, as it should be. Over the years, it transformed until it became the Marcia that appeared in La Banda de Pica Pau. If you want to read more about that story, you can do so by clicking here (plus a rather long intro about how Marcia became my most copied pattern and why I decided to include it as a courtesy on the blog).

(La versión en castellano del patrón está debajo de la versión en inglés)
La primera versión de Marcia Alpaca es del 2016, y la diseñé para la marca de hilados DMC. De un amarillo casi furioso, con aguayo y borlas súper coloridas, como corresponde. Con los años se fue transformando hasta llegar a la Marcia que salió en La Banda de Pica Pau. Si quieren leer más de esa historia pueden hacerlo cliqueando aquí (más una intro bastante larga de cómo Marcia se convirtió en mi patrón más copiado y porqué decidí dejarlo de cortesía en el blog).
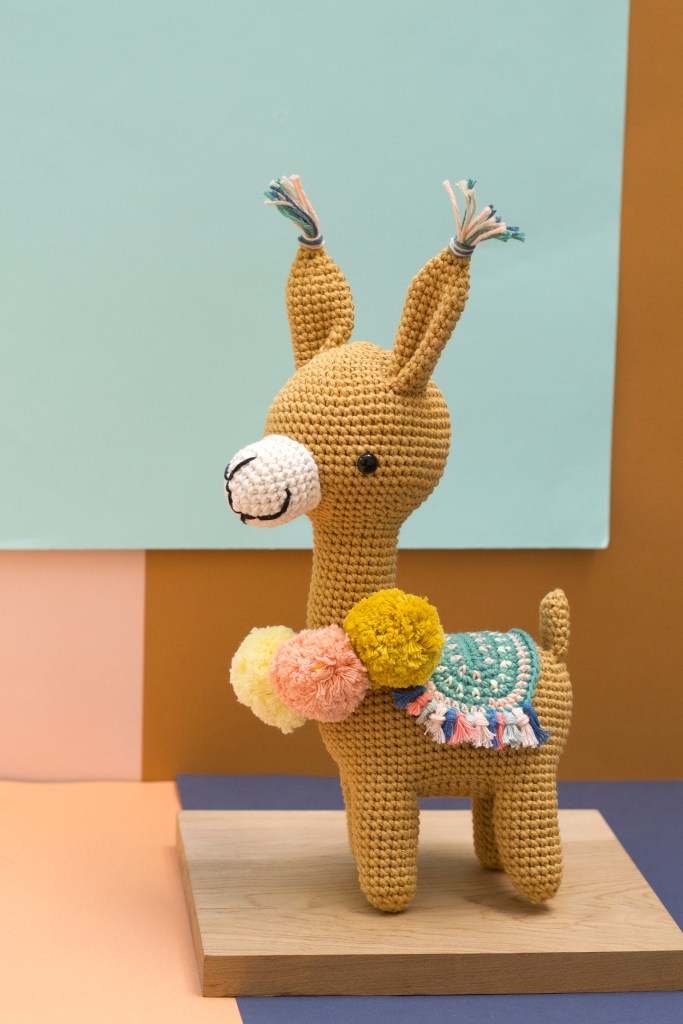
MARCIA ALPACA PATTERN

Skill level: Intermediate/Advanced

Size: 14 inches / 35.5 cm tall when made with the indicated yarn (standing, ears included)

Materials: You may crochet Marcia with any kind of thread you like with the appropriate crochet hook. In this case, for the original character that I made for my book Animal Friends of Pica Pau, I used Cotoné (a cotton yarn from Argentina) and a 2.75 crochet hook.
My suggestion:
Cotton 8/7 by Pica Pau for Hobbii Yarns in:
- 2 skein of Honey (#22)
- 1 skein of Teal Green (#28)
Different colors for pompons and tassels, like Peach Bloom (#09), Coral (#12), French Blue (#33), Dandelion (#24)
Leftover of Black (#37)
And Nude Cotton 8/7 by Pica Pau for Hobbii Yarns in:
- 1 skein of Coconut Milk (#01)
Crochet hook 2.75 mm / US C2
2 safety eyes 10 mm
Stuffing
Tapestry needle

ABBREVIATIONS
st = stitch
Rnd = round
slst = slip stitch
BLO = back loop only
FLO = front loop only
ch = chain
sc = single crochet
hdc = half double crochet
dec = decrease (2 sts together)
inc = increase (2 sts in the same st)

Before starting:
Marcia Alpaca is an intermediate/advanced project, worked in a continuous spiral. To keep track of the rounds you may use a stitch marker or safety pin to mark the beginning of a round.
The head, body and legs are worked in a single piece. Marcia Alpaca also has 2 accessories: an "aguayo" (blanket) and pompons.
Remember that it’s always advisable to give the entire pattern a read before starting crocheting and, most importantly, be patient with yourself!

SNOUT
(in coconut milk)
Rnd 1: start 6 sc in a magic ring [6]
Rnd 2: inc in all 6 st [12]
Rnd 3: (sc in next st, inc in next st) repeat 6 times [18]
Rnd 4: (sc in next 2 st, inc in next st) repeat 6 times [24]
Rnd 5: (sc in next 3 st, inc in next st) repeat 6 times [30]
Rnd 6-9: sc in all 30 st [30]
Fasten off, leaving a long tail for sewing. Embroider the mouth and nose with black yarn. Stuff the snout.

HEAD AND BODY
(in honey)
Rnd 1: start 6 sc in a magic ring [6]
Rnd 2: inc in all 6 st [12]
Rnd 3: (sc in next st, inc in next st) repeat 6 times [18]
Rnd 4: (sc in next 2 st, inc in next st) repeat 6 times [24]
Rnd 5: (sc in next 3 st, inc in next st) repeat 6 times [30]
Rnd 6: (sc in next 4 st, inc in next st) repeat 6 times [36]
Rnd 7: (sc in next 5 st, inc in next st) repeat 6 times [42]
Rnd 8: (sc in next 6 st, inc in next st) repeat 6 times [48]
Rnd 9: (sc in next 7 st, inc in next st) repeat 6 times [54]
Rnd 10-18: sc in all 54 st [54]
Rnd 19: (sc in next 7 st, dec) repeat 6 times [48]
Rnd 20: (sc in next 6 st, dec) repeat 6 times [42]
Rnd 21: (sc in next 5 st, dec) repeat 6 times [36]
Rnd 22: (sc in next 4 st, dec) repeat 6 times [30]
Rnd 23: (sc in next 3 st, dec) repeat 6 times [24]
Sew the snout between rounds 14 and 21. The snout must be placed on the opposite side of the start of the round. Insert the safety eyes between rounds 16 and 17, about 4 stitches away from the snout. Stuff the head and neck with fiberfill.
Rnd 24-37: sc in all 24 st [24]
Rnd 38: ch 15. Place the stitch marker in the next st, as this is going to be the beginning of each round from this point on. Crochet back on the chain, inc in second ch from the hook, sc in next 13 st, sc in the st where the foundation chain starts, continue on the neck, sc next 24 st, continue on the other side of the chain, sc in next 13 st, inc in last st [55]
Rnd 39: inc in next 2 st, sc in next 52 st, inc in next st [58]
Rnd 40: (sc in next st, inc in next st) repeat 2 times, sc in next 52 st, inc in next st, sc in next st [61]
Rnd 41: sc in next st, inc in next st, sc in next 2 st, inc in next st, sc in next 54 st, inc in next st, sc in next st [64]
Rnd 42: (inc in next st, sc in next 2 st) repeat 2 times, inc in next st,sc in next 54 st, inc in next st, sc in next 2 st [68]
Rnd 43-53: sc in all 68 st [68]
Do not cut the yarn.

THE LEGS
We have to divide the work to crochet the four legs.

First back leg
First, find the middle back stitch of the alpaca body. If you are not already there, continue crocheting until that point.
Then, sc in next 2 st. Place a stitch marker in the next stitch.
Sc in next 11 st, ch 7. Join the last ch and the stitch with the stitch marker by working a slst.
The leg will be formed with 11 sc of the body and the ch-7 foundation chain.
Continue working the first back leg:
Rnd 1: sc in next 18 st (11 on the body and 7 on the chain) [18]
Rnd 2-4: sc in all 18 st [18]
Rnd 5: sc in next 16 st, dec [17]
Rnd 6: sc in all 17 st [17]
Rnd 7: sc in next 15 st, dec [16]
Rnd 8: sc in all 16 st [16]
Rnd 9: sc in next 14 st, dec [15]
Rnd 10-11: sc in all 15 st [15]
Rnd 12: (sc in next st, dec) repeat 5 times [10]
Rnd 13: dec 5 times [5]
Fasten off, leaving a long tail. Using a tapestry needle, weave the yarn tail through the front loop of each remaining stitch and pull tight to close. Weave in the yarn end.

First front leg
Count 8 stitches along from the first back leg (this will become the belly) and attach mustard yarn to the 9th stitch.
Sc in next 11 st, ch 7 and join the last ch and the first sc stitch with a slst.
Rnd 1-13: repeat rounds 1-13 of the first back leg.

Second front leg
Count 4 st to the left of the first front leg (this is the space between the legs) and attach mustard yarn to the 5th stitch.
Sc in next 11 st, ch 7 and join the last ch and the first sc stitch with a slst.
Rnd 1-13: repeat rounds 1-13 of the first back leg.

Second back leg
Count 8 st to the left of the second front leg (this is the other side of the belly) and attach mustard yarn to the 9th stitch.
Sc in next 11 st, ch 7 and join the last ch and the first sc stitch with a slst.
Rnd 1-13: repeat rounds 1-13 of the first back leg.

Belly
Between the legs you have 8 stitch spaces along the sides and 4 stitch spaces at the front and back.
We make the belly by crocheting flaps on these stitches. Start with the 8 stitch space along the side. Attach mustard yarn to the first stitch next to the first leg you made.
Crochet in rows.
Row 1-14: sc in next 8 st, ch 1, turn.
Fasten off, leaving a long tail for sewing.

Flap between the legs
For the back flap, attach mustard yarn to the first stitch next to the last leg you made.
Crochet in rows.
Row 1-4: sc in next 4 st, ch 1, turn [4]
Fasten off, leaving a long tail for sewing. Work the flap between the front legs in the same way.

Assembly of the body
Using a tapestry needle, sew the front flap to both front legs and the back flap to both back legs.
Stuff each leg firmly with fiberfill.
Using a tapestry needle, sew the wide belly flap to the other side of the alpaca.
Then sew the belly flap to both legs and the flaps between them, stuffing the body as you go.

EARS
(make 2, in honey)
Rnd 1: start 5 sc in a magic ring [5]
Rnd 2: sc in all 5 st [5]
Rnd 3: inc in next 5 st [10]
Rnd 4: sc in all 10 st [10]
Rnd 5: (sc in next st, inc in next st) repeat 5 times [15]
Rnd 6-15: sc in all 15 st [15]
Fasten off, leaving a long tail for sewing. Do not stuff. Flatten and pinch the ears. Sew the ears on top of the head over rounds 6 to 8. Finish the ears by adding a colorful tassel to the tip.

TAIL
(in honey)
Rnd 1: start 5 sc in a magic ring [5]
Rnd 2: inc in next 5 st [10]
Rnd 3-8: sc in all 10 st [10]
Fasten off, leaving a long tail for sewing. Do not stuff. Flatten the tail. Sew the tail to the back over round 40.

AGUAYO / BLANKET
Rounded blanket version (in teal green or the color of your choice)
Ch 13. Stitches are worked around both sides of the foundation chain.
Rnd 1: start in second ch from the hook, sc in next 11 st, 3 sc in last st. Continue on
the other side of the foundation chain, sc in next 10 st , inc in next st [26]
Rnd 2: inc in next st, sc in next 10 st, inc in next 3 st, sc in next 10 st, inc in next 2 st [32]
Rnd 3: inc in next 2 st, sc in next 11 st, inc in next 2 st, sc in next st, inc in next 2 st, sc in next 11 st, inc in next 2 st, sc in next st [40]
Rnd 4: sc in next st, inc in next 2 st, sc in next 13 st, inc in next 2 st, sc in next 3 st, inc in next 2 st, sc in next 13 st, inc in next 2 st, sc in next 2 st [48]
Rnd 5: sc in next 2 st, inc in next 2 st, sc in next 14 st, inc in next 2 st, sc in next 6 st, inc in next 2 st, sc in next 14 st, inc in next 2 st, sc in next 4 st [56]
Rnd 6: sc in next 2 st, inc in next 2 st, sc in next 18 st, inc in next 2 st, sc in next 6 st, inc in next 2 st, sc in next 18 st, inc in next 2 st, sc in next 4 st [64]
Rnd 7: sc in all 64 st [64]
Fasten off, leaving a long tail for sewing. Finish the blanket by adding some tassels to the sides.

Rectangle blanket version (in teal green or the color of your choice)
Ch 15. Crochet in rows.
Row 1: start in second ch from hook, sc in next 14 st, ch 1, turn [14]
Row 2-23: sc in next 14 st, ch 1, turn [14]
Row 24: sc in next 14 st [14]
Fasten off, leaving a long tail for sewing. Finish the blanket by adding some tassels to the sides.
PATRÓN MARCIA ALPACA

Nivel: Intermedio/Avanzado

Altura: 36 cm (de pie, orejas incluidas)

Materiales: Puedes tejer a Marcia Alpaca con el hilado que prefieras y la aguja de crochet adecuada para ese hilado. En este caso, para el personaje original que diseñé para el libro La Banda de Pica Pau usé hilados Cotoné (hilandería TSM) y una aguja de crochet de 2,75.
Mi sugerencia:
Cotton 8/7 de Pica Pau para Hobbii en:
- 2 ovillos de Honey (#22)
- 1 ovillo de Teal Green (#28)
Colores varios para los pompones, como Peach Bloom (#09), Coral (#12), French Blue (#33), Dandelion  (#24)
Sobrante de Black (#37)
Y Nude Cotton 8/7 by Pica Pau para Hobbii en:
- 1 ovillo de Coconut Milk (#01)
Aguja de crochet de 2.75 mm / US C2
2 ojos de seguridad de 10 mm
Relleno (vellón siliconado o de lana)
Aguja de tapicería.

ABREVIATURAS
p = punto
v = vuelta
pd= punto deslizado
cad = cadena
mp = medio punto (punto bajo)
mpv = medio punto vareta (medio punto alto)
dism = disminución (2 puntos juntos)
aum = aumento (2 puntos en el mismo punto)

Antes de empezar:
Marcia Alpaca es un proyecto intermedio/avanzado, que se trabaja en espiral continuo, sin unir vueltas. Para saber dónde están ubicados, recomiendo el uso de marcadores de puntos. Muevan el marcador de puntos al comienzo de cada vuelta.
La cabeza, el cuerpo y las piernas se tejen en una sola pieza. Marcia Alpaca también incluye 2 accesorios: un aguayo y su collar de pompones
Recuerda que siempre es recomendable leer el patrón completo antes de empezar a tejer y, sobre todo, ¡tener paciencia!

HOCICO
(en “coconut milk")
1v. Tejan un anillo de 6 mp [6]
2v. 1 aum en cada uno de los 6 mp [12]
3v. (1 mp, 1 aum) repitan 6 veces [18]
4v. (2 mp, 1 aum) repitan 6 veces [24]
5v. (3 mp, 1 aum) repitan 6 veces [30]
6v-9v.1 mp en cada uno de los 30 mp [30]
Corten dejando una hebra larga para cosan. Con negro, borden la nariz y la boca.

CUERPO
(en  "honey")
1v. Tejan un anillo de 6 mp [6]
2v. 1 aum en cada uno de los 6 mp [12]
3v. (1 mp, 1 aum) repitan 6 veces [18]
4v. (2 mp, 1 aum) repitan 6 veces [24]
5v. (3 mp, 1 aum) repitan 6 veces [30]
6v. (4 mp, 1 aum) repitan 6 veces [36]
7v. (5 mp, 1 aum) repitan 6 veces [42]
8v. (6 mp, 1 aum) repitan 6 veces [48]
9v. (7 mp, 1 aum) repitan 6 veces [54]
10v-18v. 1 mp en cada uno de los 54 mp [54]
19v. (7 mp, 1 dism) repitan 6 veces [48]
20v. (6 mp, 1 dism) repitan 6 veces [42]
21v. (5 mp, 1 dism) repitan 6 veces [36]
22v. (4 mp, 1 dism) repitan 6 veces [30]
23v. (3 mp, 1 dism) repitan 6 veces [24]
Cosan el hocico entre las vueltas 14 y 22, del lado opuesto al inicio de las vueltas. Rellenen antes de terminar de coser. Coloquen los ojos de seguridad entre las hileras 16 y 17, a 3 mp del hocico. Rellenen la cabeza.
24v-37v. 1 mp en cada uno de los 24 mp [24]
Rellenen el cuello firmemente.
38v. Ubiquen el punto central en la espalda de la alpaca. De no encontrarse en ese lugar, tejan o destejan hasta llegar a ese punto. Luego, tejan 15 cad. Coloquen el marcador de puntos en el primer punto que tejan a continuación, ya que será el nuevo inicio de vueltas. Insertando la aguja en el segundo punto cadena desde la aguja, tejan sobre la cadena, 1aum, 13 mp, 1 mp sobre el mp donde inicia la cad base. Continúen sobre el cuello, 24 mp. Continúen sobre el otro lado cadena, 13 mp, 1 aum [55]
39v. 2 aum, 52 mp, 1 aum [58]
40v. (1 mp, 1 aum) repitan 2 veces, 52 mp, 1 aum, 1 mp [61]
41v. 1 mp, 1 aum, 2 mp, 1 aum, 54 mp, 1 aum, 1 mp [64]
42v. (1 aum, 2 mp) repitan 2 veces, 1 aum, 54 mp, 1 aum, 2 mp [68]
43v-53v. 1 mp en cada uno de los 68 mp [68]
No corten la hebra.

LAS PATAS
Dividan el tejido para hacer las 4 patas de la siguiente manera:

Primera pata trasera
Primero, ubiquen el punto central en la parte trasera del cuerpo de la alpaca (donde estaría la cola). De no encontrarse en ese lugar del trabajo, tejan o destejan hasta llegar a ese punto.
Luego, tejan 2 mp. Coloquen un marcador de puntos en el sig punto que tejan. Tejan 11 mp, 7 cad. Unan la última cad y el punto con el marcador haciendo 1 mp (o 1 p deslizado)
De esta forma, la pata estará formada por 11 mp en el cuerpo y 7 p cad. Continúen trabajando la primera pata trasera:
1v. 1 mp en cada uno de los 18 p (11 mp en el cuerpo y 7 mp en la cad) [18]
2v-4v. 1 mp en cada uno de los 18 mp [18]
5v. 16 mp, 1 dism [17]
6v. 1 mp en cada uno de los 17 mp [17]
7v. 15 mp, 1 dism [16]
8v. 1 mp en cada uno de los 16 mp [16]
9v. 14 mp, 1 dism [15]
10v-11v. 1 mp en cada uno de los 15 mp [15]
12v. (1 mp, 1 dism) repitan 5 veces [10]
13v. 5 dism [5]
Corten dejando una hebra larga para cerrar los últimos 5 puntos. Con la aguja de tapicería, pasen por el medio de cada punto y ajusten. Rematen.

Primera pata delantera
Cuenten 8 puntos desde la primera pata trasera, hacia la izquierda (la separación entre las patas traseras y delanteras, la panza). Con el amarillo mostaza, retomen el tejido en el punto 9.
Tejan 11 mp, 7 cad. Unan la última cad y el punto donde se encuentra el marcador haciendo 1 mp (o 1 p deslizado).
1v-13v: repitan el patrón de la primera pata trasera.

Segunda pata delantera
Cuenten 4 puntos desde la primera pata delantera, hacia la izquierda (la separación entre las patas delanteras). Con amarillo mostaza, retomar el tejido en el punto 5.
Tejan 11 mp, 7 cad. Unan la última cad y el punto donde se encuentra el marcador haciendo 1 mp (o 1 p deslizado).
1v-13v: repitan el patrón de la primera pata trasera.

Segunda pata trasera
Cuenten 8 puntos desde la segunda pata delantera, hacia la izquierda (el otro lado de la panza). Con amarillo mostaza, retomen el tejido en el punto 9.
Tejan 11 mp, 7 cad. Unan la última cad y el punto donde se encuentra el marcador haciendo 1 mp (o 1 p deslizado).
1v-13v: repitan el patrón de la primera pata trasera.

Panza
La panza se hace tejiendo una solapa pequeña en cada uno de los dos espacios de 4 p entre las patas traseras y delantera, y una solapa grande en el espacio de 8 p a los costados.
Comiencen por el espacio de 8 p. Con amarillo mostaza, retomen en el primer punto sig a la primera pata trasera. Tejan en hileras horizontales, ida y vuelta.
1h-14h. 1 mp en cada uno de los 8 mp, 1 cad, girar [8]
Corten dejando una hebra larga para coser.

Solapa entre las patas
Para la solapa posterior, con amarillo mostaza retomen en el primer punto sig a la segunda pata trasera. Tejan en hileras horizontales, ida y vuelta.
1h-4h. 1 mp en cada uno de los 4 mp, 1 cad, girar [4]
Corten dejando una hebra larga para coser. Trabajen la solapa frontal de la misma manera.

Armado del cuerpo
Usando la aguja de tapicería, cosan la solapa frontal a ambas patas delanteras y la solapa posterior a ambas patas traseras.
Rellenen firmemente cada una de las 4 patas. Con la aguja de tapicería, cosan el lado más ancho de la solapa de la panza, punto por punto, al otro lado del cuerpo. Luego, cosan la solapa de la panza a las patas y las solapas entre ellos, rellenando el cuerpo a medida que se cosan

OREJAS
(en "honey")
1v. Tejan un anillo de 5 mp [5]
2v. 1 mp en cada uno de los 5 mp [5]
3v. 1 aum en cada uno de los 5 mp [10]
4v. 1 mp en cada uno de los 10 mp [10]
5v. (1 mp, 1 aum) repitan 5 veces [15]
6v-15v. 1 mp en cada uno de los 15 mp [15]
Corten dejando una hebra larga para coser. No las rellenen Aplánenlas y dóblenlas antes de coser a la cabeza. Terminen las orejas agregándole borlas de colores en la punta.

COLA
(en "honey")
1v. Tejan un anillo de 5 mp [5]
2v. 1 aum en cada uno de los 5 mp [10]
3v-8v. 1 mp en cada uno de los 10 mp [10]
Corten dejando una hebra larga para coser. No la rellenen. Aplástenla y cósanla.

AGUAYO (manta)
Versión redondeada (tejido en espiral)
En colores a elección (sugerencia: "Teal Green" #28")
Tejan 13 cad. Tejan a ambos lados de la cadena base.
1v. Comiencen en el segundo p cad desde la aguja, 11 mp, 3 mp en el último p. Continúen al otro lado de la cadena base, 10 mp, 1 aum [26]
2v. 1 aum, 10 mp, 3 aum, 10 mp, 2 aum [32]
3v. 2 aum, 11 mp, 2 aum, 1 mp, 2 aum, 11 mp, 2 aum, 1 mp [40]
4v. 1 mp, 2 aum, 13 mp, 2 aum, 3 mp, 2 aum, 13 mp, 2 aum, 2 mp [48]
5v. 2 mp, 2 aum, 14 mp, 2 aum, 6 mp, 2 aum, 14 mp, 2 aum, 4 mp [56]
6v. 2 mp, 2 aum, 18 mp, 2 aum, 6 mp, 2 aum, 18 mp, 2 aum, 4 mp [64]
7v. 1 mp en cada uno de los 64 mp [64]
Corten dejando una hebra larga para coser. Para terminar, añadan flecos o borlas de colores a los costados.

Versión rectangular (en hileras)
En colores a elección.
Tejan 15 cad. Tejan en hileras horizontales, ida y vuelta.
1h. Comiencen en el segundo p cad desde la aguja, 14 mp, 1 cad, giren el tejido [14]
2h-23h. 1 mp en cada uno de los 14 mp, 1 cad, giren [14]
24h. 1 mp en cada uno de los 14 mp [14]
Corten dejando una hebra larga para coser. Para terminar, añadan flecos o borlas de colores a los costados.


Leave a comment